Master sureply underlayment installation a step by step guide
How to install Sureply underlayment is a question many homeowners ask when embarking on flooring projects. Sureply underlayment provides a smooth, even surface for your new flooring and offers various benefits, including sound reduction and moisture resistance. Installing Sureply underlayment is relatively straightforward and can be completed by most DIYers. This guide will walk you through the process, step-by-step, with clear instructions and helpful tips to ensure a successful installation.
how to install sureply underlayment
Installing underlayment is a crucial step in any flooring project, providing a smooth and stable base for your new floor. SurePly underlayment is a popular choice due to its durability, moisture resistance, and ease of installation.
Understanding SurePly Underlayment
SurePly underlayment is a high-density, plywood-based material designed for use under various floor coverings, including hardwood, laminate, tile, and engineered wood. It offers several advantages:
- Strength and Stability: The plywood construction provides excellent strength and rigidity, ensuring a stable foundation for your flooring.
- Moisture Resistance: SurePly is treated with a moisture-resistant finish, making it suitable for use in areas prone to moisture, like bathrooms and kitchens.
- Sound Reduction: It can help reduce noise transmission between floors, enhancing the comfort of your home.
- Easy Installation: SurePly is typically available in sheets, simplifying the installation process.
Getting Started with Your Installation
Before you begin, ensure you have the necessary tools and materials:
- SurePly underlayment: Calculate the required amount based on the size of your project.
- Circular saw or utility knife: For cutting the underlayment to size.
- Tape measure: For accurate measurements.
- Pencil: For marking cutting lines.
- Safety glasses and gloves: For protection during cutting and handling.
- T-pins or staples: For securing the underlayment to the subfloor.
Step-by-Step Guide to Installing SurePly Underlayment
-
Prepare the Subfloor: Before installing the underlayment, ensure the subfloor is clean, level, and free from debris. Repair any cracks or gaps in the subfloor using wood filler or patching compound.
-
Measure and Cut SurePly: Measure the area where you will be installing the underlayment and mark the desired size on the SurePly sheets using a pencil. Cut the sheets to size using a circular saw or utility knife.
-
Install the Underlayment:
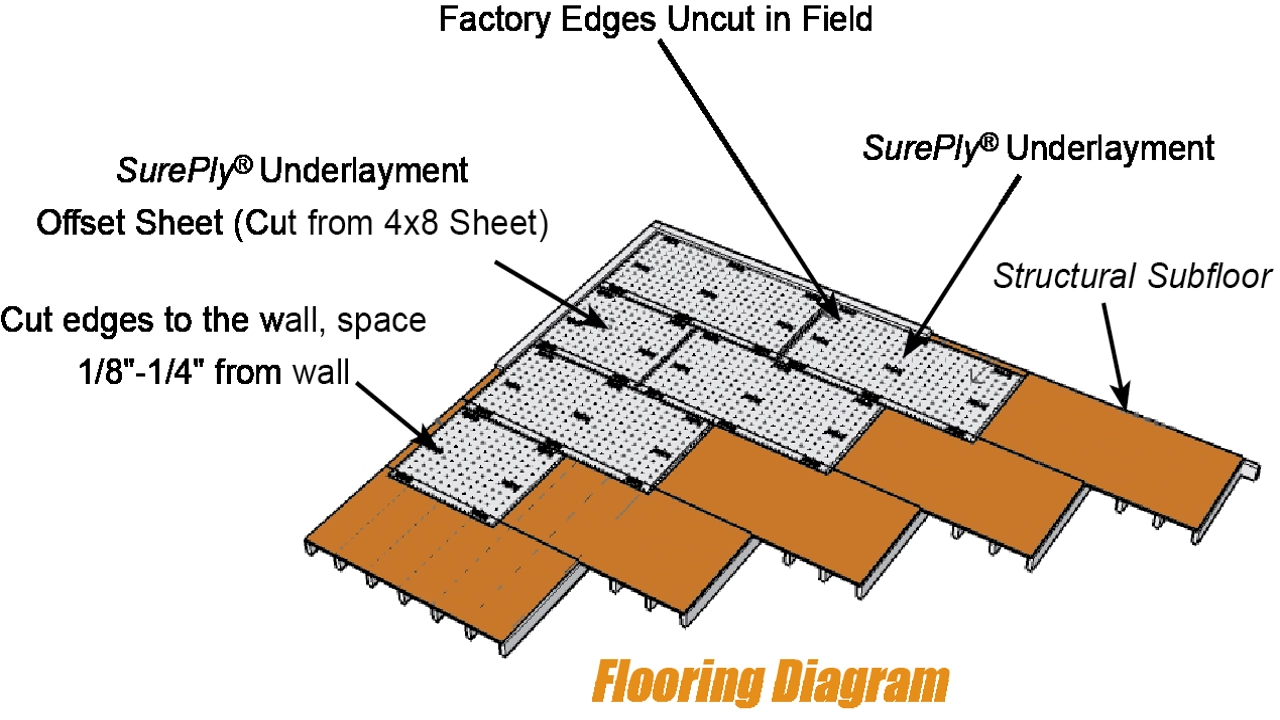
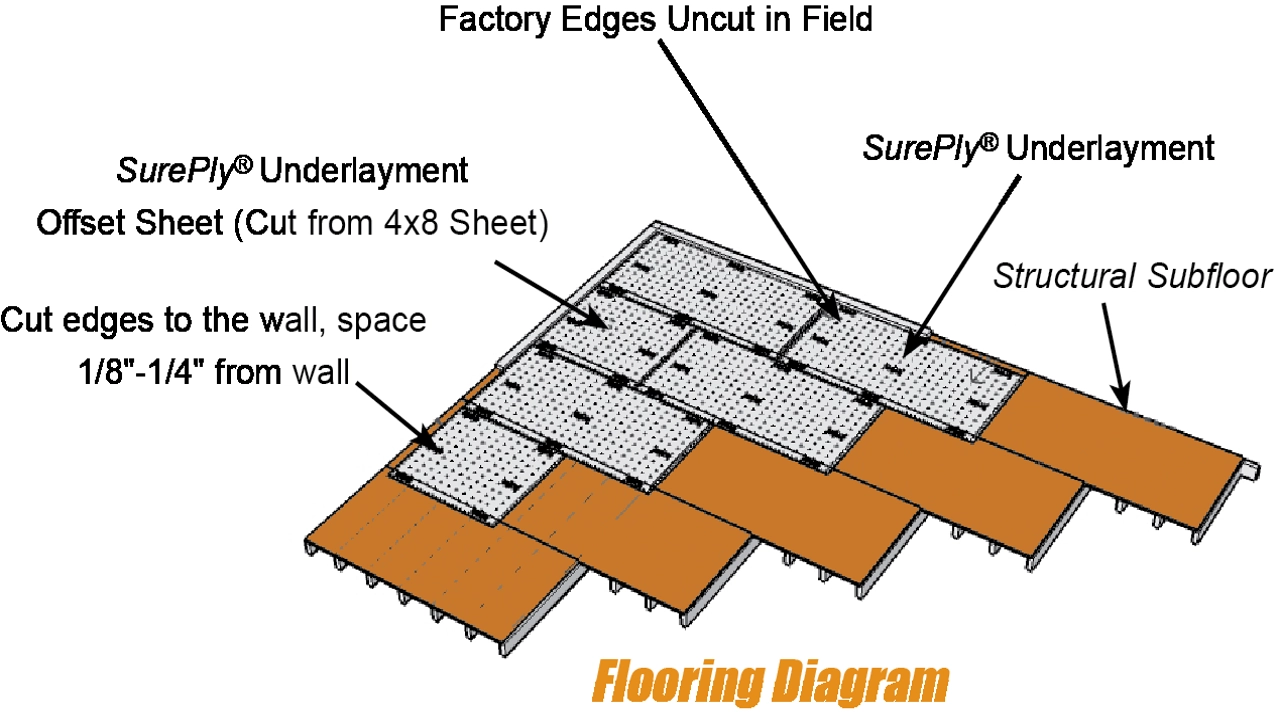
- Start in a corner: Begin laying the SurePly sheets from a corner of the room, ensuring they are butted tightly against each other.
- Secure the Sheets: Use T-pins or staples to secure the SurePly sheets to the subfloor. Space the fasteners evenly, typically around 6 inches apart.
- Stagger the Seams: When installing multiple sheets, stagger the seams to create a more stable and even surface.
- Cut for Pipes and Obstacles: If you encounter pipes or other obstacles, carefully cut the SurePly to fit around them, leaving at least a quarter-inch gap for expansion.
-
Finishing Touches:
- Trim Excess: Trim any excess underlayment along the edges using a utility knife.
- Install the Flooring: Once the SurePly underlayment is securely installed, you can proceed with installing your chosen flooring.
Tips for a Successful Installation
- Acclimate SurePly: Before installing SurePly, let it acclimate to the room temperature for at least 24 hours. This will help prevent warping or expansion.
- Use a Moisture Barrier: For areas prone to moisture, consider using a moisture barrier underneath the SurePly underlayment.
- Hire a Professional: If you are unsure about any aspect of the installation process, it is best to hire a qualified professional to install the SurePly underlayment.
Troubleshooting Common Issues
- Uneven Subfloor: If the subfloor is uneven, you may need to use a leveling compound before installing the underlayment.
- Moisture Issues: If you notice moisture problems in the subfloor, address them before installing the underlayment.
- Swelling or Warping: If the underlayment swells or warps, ensure proper acclimation and ventilation.
Variations and Alternatives
- SurePly Underlayment Installation with Glue: While staples or T-pins are commonly used, some manufacturers recommend using construction adhesive to secure the underlayment to the subfloor, especially in areas with heavy foot traffic.
- Other Underlayment Options: While SurePly is a popular choice, other underlayment options are available, such as foam underlayment, rubber underlayment, or cork underlayment. Each type offers different benefits, so consider your flooring type and specific needs when choosing the best option.
Additional Resources
- SurePly Manufacturer Website: The SurePly manufacturer’s website provides detailed information, installation instructions, and product specifications.
- DIY Flooring Installation Guide: A general guide to installing underlayment for various flooring types.
Keywords:
- How to install SurePly underlayment
- Installing SurePly underlayment
- SurePly underlayment installation guide
- SurePly underlayment installation tips
- SurePly underlayment installation process
- SurePly underlayment instructions
- Underlayment installation for flooring
- DIY SurePly underlayment installation
- Best way to install SurePly underlayment
- SurePly underlayment for hardwood floors
- SurePly underlayment for laminate floors
- SurePly underlayment for tile floors
- SurePly underlayment for engineered wood floors
- Installing SurePly underlayment in a bathroom
- Installing SurePly underlayment in a kitchen
Remember to consult the SurePly manufacturer’s instructions for specific details and recommendations related to your project.
sureply underlayment can you really install it in 5 minutes
Installing a new floor is a great way to upgrade your home, but it’s important to have the right underlayment for the job. SurePly is a popular choice for its durability and moisture resistance, making it ideal for various flooring types, from hardwood to tile. Whether you’re a seasoned DIYer or a first-timer, understanding how to install SurePly underlayment properly is crucial for a successful flooring project.
Understanding SurePly Underlayment
SurePly is a plywood underlayment specifically designed to provide a stable and smooth surface for your flooring. It offers several benefits:
- Stability: It creates a solid foundation for your flooring, reducing squeaks and unevenness.
- Moisture Resistance: Its moisture-resistant properties help protect your flooring from subfloor moisture, preventing warping and damage.
- Durability: SurePly is strong and long-lasting, offering a reliable underlayment solution for years to come.
Before You Begin: Tools and Materials
Before you begin installing SurePly, gather the necessary tools and materials:
- SurePly underlayment: Calculate the required amount based on your flooring area.
- Measuring tape: For accurate measurements.
- Circular saw or jigsaw: For cutting the SurePly sheets to size.
- Safety gear: Wear safety glasses and gloves.
- Screwdriver or drill with a drill bit: For fastening the SurePly to the subfloor.
- Screws: Use screws specifically designed for attaching plywood to subfloors.
- Level: To ensure the SurePly is level and flat.
- Utility knife: For trimming any excess SurePly.
Step-by-Step Installation Guide
- Prepare the Subfloor: The subfloor should be clean, dry, and free of debris. Inspect for any unevenness or damage. If necessary, repair or replace damaged subfloor sections.
- Measure and Cut: Measure the room’s dimensions and cut the SurePly sheets to size using a circular saw or jigsaw. Make sure to leave a small gap (about 1/8 inch) between the sheets to allow for expansion and contraction.
- Lay the First Row: Start laying the SurePly sheets from one of the walls. Ensure the sheets are aligned properly and that the joints between them are staggered.
- Fasten the Sheets: Secure the SurePly sheets to the subfloor using screws or staples. Use a level to ensure the sheets are flush and level. Space screws or staples at least 8 inches apart.
- Continue Laying and Fastening: Continue laying and fastening the SurePly sheets, working across the room in a staggered pattern. Maintain consistent spacing and ensure that all sheets are level.
- Trim the Edges: Use a utility knife to trim any excess SurePly around the edges of the room.
- Inspect for Evenness: Once the entire floor is covered with SurePly, double-check for evenness and any gaps.
Additional Tips
- Consider using a moisture barrier: If your subfloor is susceptible to moisture, consider adding a moisture barrier under the SurePly for extra protection.
- Stagger the seams: Always stagger the seams between the SurePly sheets to prevent weak points.
- Ensure proper ventilation: Ensure adequate ventilation in the room to prevent moisture buildup.
- Plan ahead: Before beginning installation, determine the amount of SurePly you’ll need and ensure you have all the necessary tools.
Common Mistakes to Avoid
- Skipping the subfloor preparation: A clean and even subfloor is crucial for a successful SurePly installation.
- Using the wrong screws: Use screws designed for attaching plywood to subfloors.
- Not using a level: Ensure the SurePly is level to prevent uneven flooring.
- Failing to stagger the seams: Properly staggered seams distribute weight evenly and reduce the risk of weak spots.
Installing SurePly underlayment is a straightforward process that significantly improves the longevity and performance of your flooring. By following these steps and avoiding common mistakes, you can ensure a smooth and successful installation.
SurePly Underlayment Installation Q&A
Q: What is SurePly underlayment, and why should I use it?
A: SurePly underlayment is a high-density, structural plywood panel specifically designed for use under flooring. It offers superior strength, stability, and moisture resistance compared to traditional plywood. This translates to a quieter floor, reduced squeaks, and better overall performance for your flooring system.
Q: How do I choose the right thickness of SurePly underlayment?
A: The thickness of SurePly underlayment depends on the type of flooring you’re installing and the subfloor condition.
Hardwood flooring: 3/8″ or 1/2″ is typically recommended.
* Tile: 1/2″ is recommended for added support and stability.
* Engineered wood flooring: Thickness can be customized based on specific flooring requirements.
* Subfloor condition:* If you have a subfloor with irregularities, you might consider a thicker SurePly underlayment for better leveling.
Q: How do I install SurePly underlayment?
A:
- Prepare the subfloor: Ensure the subfloor is clean, level, and free of debris.
- Lay the SurePly panels: Start in a corner and work your way across the room, using a saw to cut panels to size. Ensure proper spacing between panels.
- Fasten the panels: Secure the panels to the subfloor with screws or nails, using a drill driver or hammer. Follow manufacturer’s guidelines for fastener spacing and depth.
- Seal the edges: Use sealant to seal the edges of the SurePly panels, preventing moisture intrusion.
- Install flooring: Once the SurePly underlayment is installed, you can proceed with installing your chosen flooring.
Q: Can I install SurePly underlayment over concrete?
A: Yes, SurePly underlayment can be installed over concrete subfloors. Ensure the concrete surface is clean, level, and dry before installation.
Q: Is SurePly underlayment moisture-resistant?
A: Yes, SurePly underlayment is engineered to resist moisture. It is a great choice for areas prone to moisture, such as bathrooms or kitchens.
Q: Can I install SurePly underlayment myself?
A: While SurePly installation is generally straightforward, it’s best to consult the manufacturer’s instructions and consider your experience level. If you’re unsure, it’s always a good idea to hire a professional.
Q: How much does SurePly underlayment cost?
A: The price of SurePly underlayment varies depending on thickness, size, and retailer. It is typically considered a premium option compared to traditional plywood, but its long-term benefits and enhanced performance can be worth the investment.
Q: Where can I buy SurePly underlayment?
A: SurePly underlayment can be purchased at most home improvement stores and lumber yards. You can also check online retailers for competitive pricing and availability.
Conclusion
Installing SurePly underlayment is a straightforward process that can significantly enhance your flooring project. By following our step-by-step guide, you can ensure proper installation, resulting in a stable, durable, and moisture-resistant base for your flooring. Remember to use the right tools, adhere to proper measurements, and prioritize safety throughout the process.
We hope this guide has empowered you to tackle your SurePly underlayment installation with confidence. We’d love to hear about your experiences! Share your thoughts and tips in the comments below. And if you found this guide helpful, please consider sharing it on social media to help others achieve their flooring goals. Let’s build a community of DIY enthusiasts!

