Build your own toe kick base a diy guide you can follow
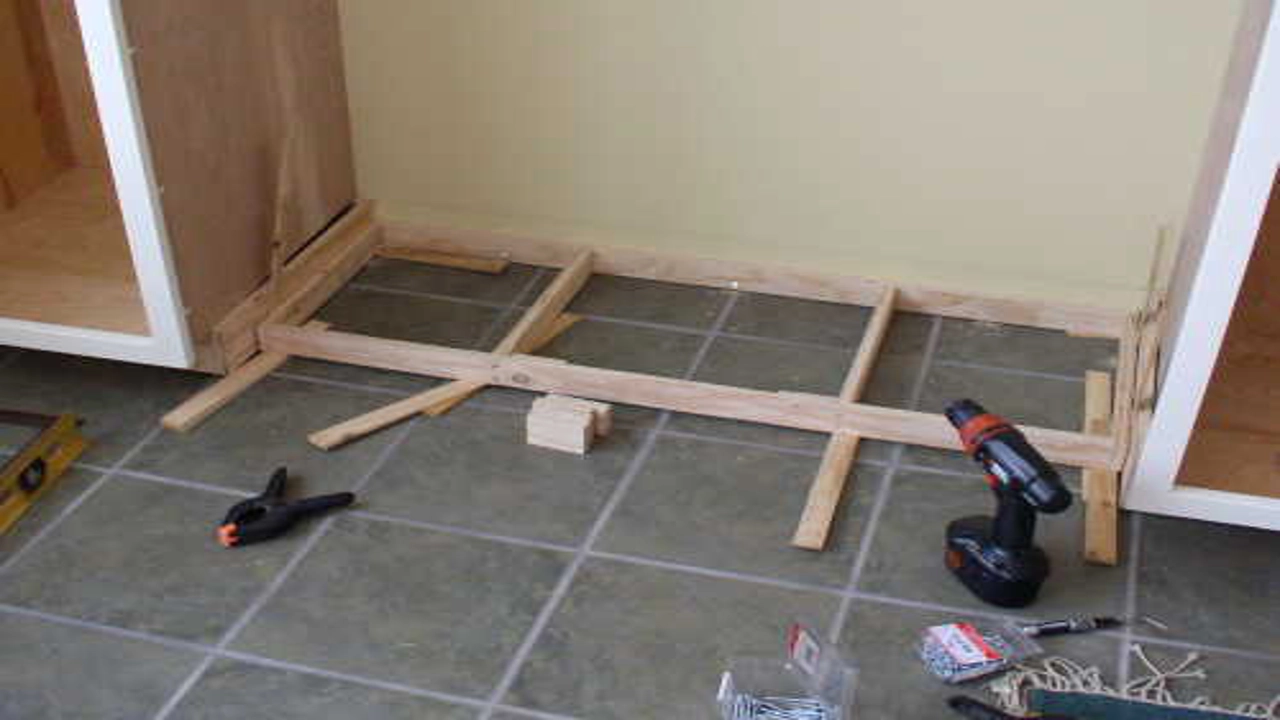
How to build a toe kick base is a valuable skill for any DIY enthusiast looking to enhance their kitchen, bathroom, or laundry room. A toe kick base provides a finished look and protects the underside of cabinets while adding functionality. The process involves building a frame from wood and attaching it to the base of your cabinets. You’ll need a few tools and materials, including a saw, drill, screws, and wood.
Start by measuring the space where you want to install the toe kick and cutting the wood pieces to size. Then, assemble the frame using wood glue and screws, ensuring the pieces are securely attached. Once the frame is complete, attach it to the base of the cabinets using screws or nails. With a little patience and the right tools, building a toe kick base can significantly elevate the aesthetic and functionality of your space.
build a toe kick base the secret to a perfect kitchen
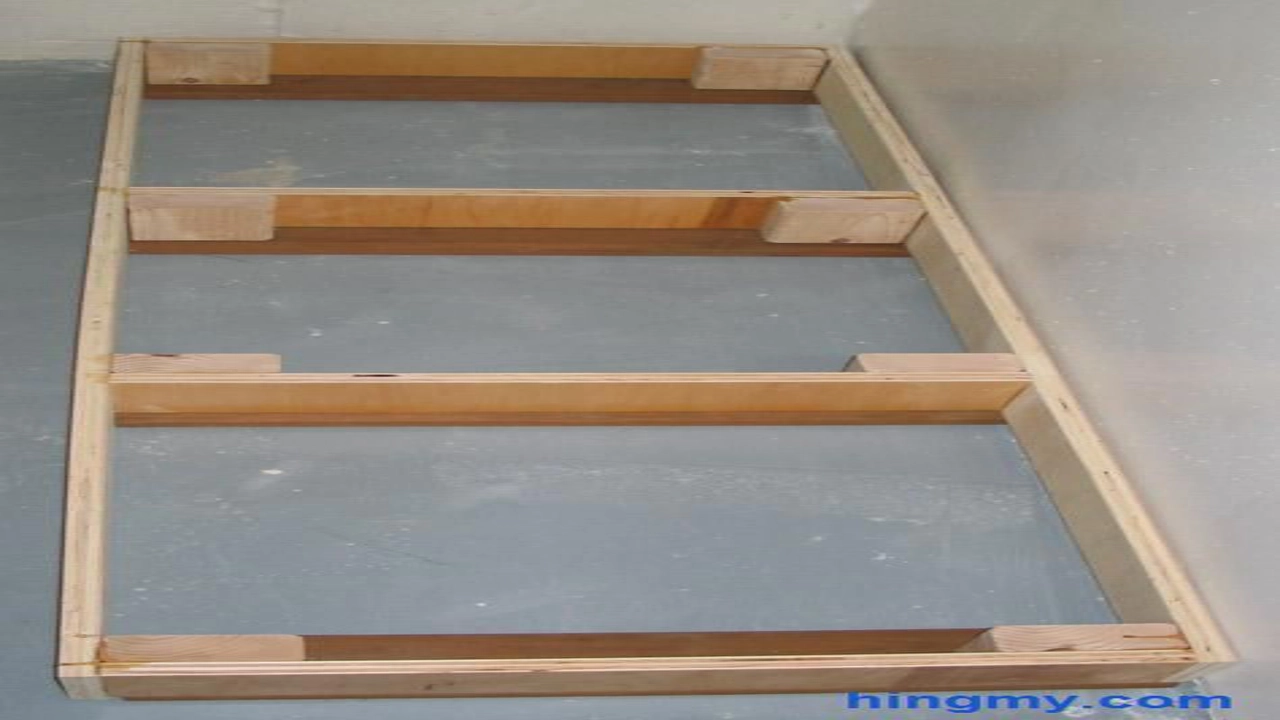
Building a toe kick base might seem like a small detail, but it can dramatically impact the look and functionality of your cabinets. A well-designed toe kick adds a finished touch to your cabinetry and provides a convenient space for cleaning and vacuuming. This guide will walk you through the process of building a toe kick base, whether you’re a seasoned DIYer or just starting.
Planning Your Toe Kick Base
Before you start cutting and assembling, it’s essential to plan your toe kick base carefully.
1. Measure Twice, Cut Once
The first step is to accurately measure the area where you’ll be installing the toe kick. You’ll need to measure the width and depth of the cabinet base, and the height of the toe kick itself. Standard toe kick heights range from 3 to 4 inches, but you can adjust this based on personal preference.
2. Material Selection
You have several options for toe kick materials:
- Plywood: A budget-friendly and versatile choice that’s readily available.
- MDF: Offers a smooth, paintable surface but is more susceptible to moisture damage.
- Hardwood: A premium option that’s durable and adds a touch of elegance.
3. Tools for the Job
Gather your tools:
- Measuring tape
- Pencil
- Saw (circular or miter saw)
- Router (optional for decorative edging)
- Screwdriver or drill
- Wood screws
- Clamps
- Safety goggles
- Dust mask
Building Your Toe Kick Base
Now that you’re prepared, it’s time to start building!
1. Cutting the Pieces
Cut your chosen material into the required dimensions.
2. Assembling the Toe Kick Base
Assemble the toe kick panels using wood glue and screws. For a more secure joint, use wood glue on the inside of the joint and screw from the outside.
3. Finishing Touches
- Sand: Sand the toe kick base to smooth out any rough edges and create a consistent surface for painting or staining.
- Finishing: Choose your desired finish. You can paint, stain, or leave the toe kick base natural.
Installing the Toe Kick Base
Once the toe kick base is built and finished, you’re ready for installation:
1. Attaching to Cabinets
Secure the toe kick base to the cabinets using screws or construction adhesive.
2. Adding a Decorative Edge (Optional)
For a more polished look, you can use a router to add a decorative edge to the toe kick base. This can create a variety of effects, such as a raised lip or a rounded profile.
Alternatives to Building a Toe Kick Base
While building a toe kick base yourself can be rewarding, you may consider other options:
- Pre-made toe kick: These are readily available at most hardware stores and come in various sizes and finishes.
- Toe kick moldings: If you have an existing toe kick that needs a more polished look, consider adding moldings to upgrade its appearance.
Troubleshooting
Here are some common challenges and their solutions when building a toe kick base:
- Uneven flooring: Use shims or adjust the toe kick base height to accommodate uneven flooring.
- Gaps between cabinets and the toe kick: Ensure proper measurements before assembling.
- Awkward corners: Use a miter saw to cut the panels at a 45-degree angle for a seamless fit.
How to Build a Toe Kick Base in Different Scenarios
Let’s explore different scenarios and how to build a toe kick base effectively:
1. Building a Toe Kick Base for a Curved Cabinet
For curved cabinets, you’ll need to create a curved toe kick base. This can be done by bending plywood or using pre-curved pieces. You can also use multiple pieces of wood to create the curve.
2. Building a Toe Kick Base for a Kitchen Island
The toe kick base for a kitchen island is typically made from plywood and attached to the bottom of the island frame. You can use a miter saw to create precise corners and ensure a clean finish.
3. Building a Toe Kick Base for a Bathroom Vanity
Bathroom vanities often feature a toe kick base that’s made from water-resistant materials like MDF or plywood. Ensure that the toe kick base is properly sealed and waterproof to prevent moisture damage.
4. Building a Toe Kick Base for a Laundry Room Cabinet
Laundry room cabinets may have a toe kick base made from durable materials like hardwood or plywood. You can also consider using a water-resistant finish to protect against spills and moisture.
How to Build a Toe Kick Base on a Budget
Building a toe kick base doesn’t have to be expensive. Here are some budget-friendly tips:
- Use salvaged or recycled wood: Check local salvage yards or repurpose old furniture for your toe kick base.
- Consider using MDF: MDF is less expensive than plywood or hardwood but requires careful handling and sealing.
- Simplify the design: Avoid intricate designs and focus on clean lines to keep costs down.
How to Build a Toe Kick Base for a Small Space
If you have limited space, consider these tips for building a toe kick base in a small area:
- Choose a slimmer toe kick base: Reduce the depth of the toe kick base to create more floor space.
- Use a light color for the toe kick base: A light color can visually enlarge a small space.
- Minimize the number of pieces: Simplify the design to reduce the number of cuts and joints needed.
How to Build a Toe Kick Base for an Uneven Floor
An uneven floor can make building a toe kick base challenging. Here’s how to handle this situation:
- Use shims: Place shims under the toe kick base to level it out.
- Adjust the toe kick base height: Cut the toe kick base at a slight angle to match the uneven floor.
- Use a flexible material: Consider using a flexible material like plywood to accommodate uneven flooring.
How to Build a Toe Kick Base Without Using Power Tools
Building a toe kick base without power tools is possible, but it may require more time and effort. Here are some tips:
- Use a hand saw: A hand saw can be used to cut the toe kick base pieces, but it may take longer and require more precision.
- Use a chisel and mallet: For intricate designs, you can use a chisel and mallet to shape the wood.
- Use hand screws: Hand screws can be used to clamp the pieces together during assembly.
Final Thoughts on How to Build a Toe Kick Base
Building a toe kick base is a rewarding DIY project that can enhance the look and functionality of your cabinets. With proper planning, careful execution, and some creativity, you can create a custom toe kick base that perfectly complements your cabinetry and adds value to your home.
want a toe kick base that s stronger than your willpower
You might think that the perfect kitchen revolves around fancy countertops, high-end appliances, or a stunning backsplash. But the true secret to a truly functional and comfortable kitchen might just lie in something much simpler: a well-built toe kick base.
Think about it: you spend a good amount of time standing in your kitchen, preparing meals, cleaning up, or just enjoying a cup of coffee. A well-designed toe kick base can make a world of difference in your comfort and overall kitchen experience.
What is a Toe Kick Base?
A toe kick base is the small, often unseen space beneath your kitchen cabinets. It’s not just a gap – it’s a crucial design element that can make a big difference in how your kitchen feels and functions.
Why is a Toe Kick Base Important?
- Comfort: A properly sized toe kick base allows you to stand comfortably at your countertops, preventing fatigue and strain on your legs.
- Accessibility: It provides easier access to the space beneath cabinets for cleaning and storage.
- Aesthetics: A well-designed toe kick can add a subtle but elegant touch to your kitchen’s overall design.
Building a Toe Kick Base: A Simple Guide
Building a toe kick base is a relatively straightforward project, even for beginners. Here’s a basic outline:
- Materials: You’ll need plywood, a saw, screws, and a drill.
- Measurements: Measure the space under your cabinets and cut the plywood accordingly.
- Assembly: Use screws to attach the plywood to the base of the cabinets.
Important Considerations:
- Toe Kick Height: The ideal toe kick height is around 4 inches.
- Materials: Choose durable materials like plywood or MDF.
- Finish: You can paint or stain the toe kick base to match your kitchen cabinets.
Tips for a Perfect Toe Kick Base:
- Consider a kick plate: This is a decorative piece that covers the toe kick base and adds a finishing touch.
- Think about functionality: You can add a toe kick drawer for extra storage.
- Use the right tools: A circular saw and a drill are essential for this project.
Building a toe kick base is a simple yet crucial step towards achieving the perfect kitchen. It’s a seemingly small detail that can significantly improve your kitchen’s functionality and aesthetics. So, take the time to build it right, and enjoy the benefits of a well-designed kitchen space.
Related Search Queries:
- how to build a toe kick base for kitchen cabinets
- how to build a toe kick base for cabinets
- toe kick base construction
- diy toe kick base
- toe kick base dimensions
- toe kick base installation
- toe kick base ideas
- toe kick base drawer
- toe kick base materials
- how to add a toe kick base to existing cabinets
Remember, building a toe kick base is just one step in creating a dream kitchen. Don’t be afraid to experiment with different materials and designs to find what works best for your space and style. And most importantly, have fun with the process!
Q&A: Building a Toe Kick Base
Q1: What is a toe kick base and why do I need one?
A1: A toe kick base is a small, angled piece of wood or other material that is attached to the bottom of cabinets to create a finished look and provide a small space for your toes. They are essential for:
- Aesthetics: Toe kicks create a clean, finished look for your cabinetry and prevent the appearance of gaps between the bottom of the cabinets and the floor.
- Functionality: They provide space for your toes, making it easier to move around the kitchen or other spaces where you have cabinetry.
- Protection: They protect the lower portion of the cabinets from damage caused by kicked toes, chairs, and other objects.
Q2: What materials are suitable for building a toe kick base?
A2: You can use a variety of materials for your toe kick base, depending on your budget and desired aesthetics. Common choices include:
- Plywood: Affordable, durable, and easy to work with.
- MDF (Medium-density Fiberboard): Smooth, paintable surface, but less water-resistant than plywood.
- Solid wood: Adds a more traditional and luxurious look, but can be more expensive.
- PVC: Water-resistant and easy to clean, but can be more expensive.
Q3: What tools do I need to build a toe kick base?
A3: You’ll need some basic tools for building a toe kick base, including:
- Measuring tape: For accurate measurements.
- Saw (circular, miter, or hand saw): For cutting the toe kick pieces.
- Screwdriver or drill: For attaching the toe kick to the cabinets.
- Level: For ensuring the toe kick is level.
- Clamps: For holding the toe kick in place while attaching it.
- Safety glasses and gloves: For protection.
Q4: How do I measure for my toe kick base?
A4: Measure the width and depth of the area where you want to install the toe kick. You can use a level to ensure that the base will be level. Remember to account for any baseboard or other trim that might be present.
Q5: How do I attach the toe kick base to the cabinet?
A5: You can use screws, nails, or construction adhesive to attach the toe kick to the cabinet. It’s essential to pre-drill holes for screws to prevent splitting the wood. Choose screws long enough to secure the toe kick firmly to the cabinet.
Q6: How do I cut corners for my toe kick base?
A6: You can use a miter saw to cut precise 45-degree angles for the corners of your toe kick base. Alternatively, you can use a circular saw or hand saw to make straight cuts and then carefully trim the edges to create a tight fit.
Q7: How do I finish my toe kick base?
A7: After installation, you can paint or stain your toe kick base to match your cabinets or the rest of your decor. Ensure the surface is clean and dry before applying any paint or stain.
Q8: What are some tips for building a successful toe kick base?
A8:
- Plan ahead: Carefully measure and plan your toe kick base before you start cutting and installing.
- Use quality materials: Invest in good quality wood or other materials to ensure durability and longevity.
- Measure twice, cut once: Accuracy is key when building a toe kick base, so double-check your measurements before making any cuts.
- Take your time: Don’t rush the process, especially when making cuts and attaching the base.
- Don’t be afraid to ask for help: If you are unsure about any aspect of the project, seek advice from a professional or experienced DIYer.
Q9: What are some alternatives to building a toe kick base?
A9: While building a toe kick base is often the most affordable and customizable option, there are other alternatives available, such as:
- Pre-made toe kick bases: Available in various materials and sizes, these options are easier to install than building your own.
- Cabinet toe kick kits: These kits often include everything you need to create a seamless toe kick, including pre-cut pieces and installation instructions.
Q10: Are there any common mistakes to avoid when building a toe kick base?
A10: Some common mistakes to avoid include:
- Not measuring accurately: This can lead to gaps or unevenness in the toe kick.
- Using the wrong screws: Using screws that are too short can result in the toe kick coming loose.
- Not pre-drilling holes: This can cause the wood to split when you screw it in.
- Not ensuring the toe kick is level: This will affect the look and functionality of the base.
- Rushing the installation: Taking your time will ensure a neat and professional finish.
Conclusion
Building a toe kick base is a simple yet effective way to elevate your kitchen or bathroom cabinets, creating a cleaner and more organized space. By following the steps outlined in this post, you can easily create a custom toe kick that complements your existing cabinetry and enhances the overall aesthetics of your room. Remember to choose the right materials, measure carefully, and take your time during installation to ensure a professional finish.
Now that you’ve learned how to build a toe kick base, we’d love to hear from you! Share your experiences, tips, or any questions you may have in the comments below. If you found this guide helpful, don’t forget to share it with your friends and family on social media. Let’s spread the knowledge and help everyone create their dream kitchen or bathroom!
