
Change your pot light bulb like a pro
How to change a lightbulb in a pot light
Changing a lightbulb in a pot light can seem intimidating, but it’s actually a simple task. With a few basic tools and a little patience, you can easily replace a burnt-out bulb and restore illumination to your space.
First, turn off the power to the fixture at the breaker box. Next, locate the access panel in the ceiling or wall. This panel will usually be marked with a small arrow or symbol indicating the location of the lightbulb. Carefully remove the panel and you will have access to the lightbulb. Now you can safely remove the old bulb and replace it with a new one.
how to change a lightbulb in a pot light

Replacing a Lightbulb in a Pot Light: A Step-by-Step Guide
Pot lights, also known as recessed lights, are a popular lighting choice for many homes. They offer a sleek, modern look and can be easily installed in various ceilings. But what happens when one of these lights goes out? How do you change a lightbulb in a pot light?
Fear not! Replacing a bulb in a pot light isn’t as daunting as it might seem. With a few simple steps and the right tools, you can tackle this task quickly and safely.
Essential Tools and Safety Precautions
Before you start, gather the necessary tools and take proper safety precautions.
Tools you’ll need:
- New lightbulb: Ensure you purchase the correct type and wattage for your fixture. Refer to the original bulb or your fixture’s specifications.
- Ladder or step stool: Safely reach the pot light.
- Screwdriver: A standard Phillips-head screwdriver will usually do the trick.
- Gloves: Protect your hands from potential cuts or scratches.
- Flashlight: Helpful for illuminating the work area, especially if the circuit is off.
- Non-contact voltage tester: This tool can help you verify the power is off before working on the fixture.
Safety Precautions:
- Turn off the power: Locate the circuit breaker controlling the pot light and switch it off. This is the most crucial safety step.
- Double-check for power: Always use a non-contact voltage tester to confirm that the circuit is indeed dead before touching any wires or the fixture.
- Wear safety glasses: Protect your eyes from potential debris or sparks.
- Don’t reach into tight spaces: If you can’t easily access the bulb, don’t force it. It’s safer to call a professional electrician.
Step-by-Step Guide to Replacing a Lightbulb in a Pot Light
Now that you’re equipped and ready, let’s dive into the process of changing a lightbulb in a pot light.
- Access the Light Fixture:
-
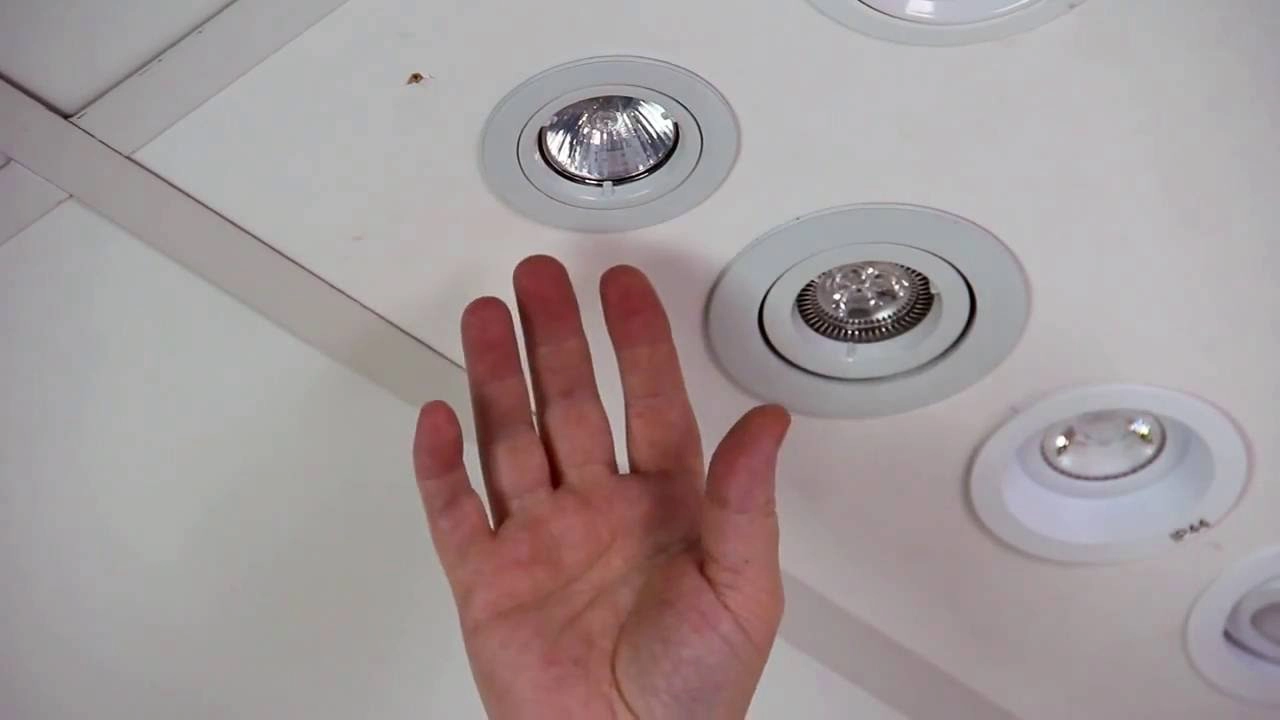
Find the pot light that needs a new bulb. You might need to remove a decorative trim or cover to access the fixture.
-
Unscrew the Old Bulb:
-
Gently twist the old lightbulb counterclockwise to remove it. If the bulb is stuck, try gently wiggling it back and forth while turning.
-
Install the New Bulb:
-
Carefully align the new bulb with the socket. Twist the new bulb clockwise until it’s securely in place.
-
Replace the Trim or Cover:
-
If you removed a trim or cover, reattach it to the pot light.
-
Turn the Power Back On:
- Once the bulb is installed, carefully turn the power back on at the circuit breaker. Check that the new bulb illuminates correctly.
Troubleshooting Common Issues
Sometimes, changing a lightbulb in a pot light can present some challenges:
- Bulb won’t turn: The bulb might be damaged or not compatible with the socket. Ensure the bulb is properly aligned and in working condition.
- Bulb is extremely hot: The fixture might have a wiring issue causing excessive heat. Consult a professional electrician for assistance.
- Bulb flickers or dims: This could indicate a loose connection or a problem with the wiring. Double-check the wiring connections, especially those around the fixture.
Additional Tips and Considerations
- Choose the right bulb: Pot lights often use different types of bulbs, such as LED, halogen, or CFL. Check the specifications of your fixture or the old bulb to ensure you buy the correct type.
- Consider energy-efficient options: LED bulbs are known for their energy efficiency and longer lifespan, making them a great choice for pot lights.
- Regular maintenance: Inspect your pot lights periodically for any signs of damage or wear and tear. This can help prevent future problems.
Related Search Queries
Here are some related search queries you might find helpful:
- How to change a lightbulb in a recessed light
- Replacing a lightbulb in a pot light
- How to change a lightbulb in a recessed ceiling light
- Changing a lightbulb in a recessed lighting fixture
- Can I change a lightbulb in a pot light myself?
- How to change a lightbulb in a ceiling light
- Troubleshooting recessed lighting
- What kind of lightbulbs do pot lights use?
- How to replace a light fixture in a pot light
- Recessed light bulb replacement guide
Remember, safety is paramount when working with electricity. If you’re unsure about any aspect of changing a lightbulb in a pot light, or if you encounter any complex wiring issues, it’s best to consult a qualified electrician.
can you change a lightbulb in a pot light without losing your mind
Changing a lightbulb in a pot light can seem daunting, especially if you’re not familiar with the process. However, with the right tools and a little knowledge, it’s a straightforward task.
Gather Your Supplies
Before you start, make sure you have the following items:
- New lightbulb: Ensure you purchase a bulb with the correct wattage and type for your pot light.
- Screwdriver: You’ll need a screwdriver that matches the screws holding the pot light fixture in place. Often, it’s a Phillips head screwdriver.
- Safety glasses: Protect your eyes from any falling debris.
- Optional: If you have a recessed light fixture, you might need a pair of pliers to help remove the bulb.
Safety First
- Turn off the power: Before attempting to change any lightbulb, always locate the circuit breaker controlling the pot light and switch it off.
- Double-check: After turning off the power, use a voltage tester to ensure the fixture is completely de-energized.
Step-by-Step Guide
- Remove the light fixture cover: Most pot light fixtures have a trim ring or a cover plate that needs to be removed. Gently pry off the cover using a flathead screwdriver. Be careful not to scratch or damage the surrounding surface.
- Locate the bulb: You’ll see the lightbulb inside the fixture. If it’s a recessed light, the bulb may be housed in a spring-loaded fixture.
- Remove the old bulb: If you’re dealing with a traditional pot light, simply unscrew the old bulb counterclockwise. For recessed lights, gently pull the bulb down to release the spring mechanism.
- Install the new bulb: Carefully screw the new bulb clockwise into the socket. Make sure it’s firmly secured. Don’t overtighten the bulb.
- Reassemble the fixture: Replace the trim ring or cover plate, making sure it’s securely fastened.
- Turn the power back on: After you’ve reassembled the fixture, turn the power back on at the circuit breaker. Check to see if the new lightbulb is working correctly.
Troubleshooting Common Problems
- Bulb won’t screw in: If the new bulb doesn’t screw in properly, make sure you’re using the correct type and that the socket is clean.
- Light doesn’t turn on: If the light doesn’t turn on after replacing the bulb, double-check the power is turned on. Also, ensure you didn’t damage the wiring during the process.
Additional Tips
- Use a ladder: If the pot light is high up, use a sturdy ladder to reach it safely.
- Wear gloves: Consider wearing gloves to protect your hands from any dirt or grime on the fixture.
- Dispose of old bulbs properly: Dispose of old lightbulbs responsibly. Some bulbs contain hazardous materials and should be recycled.
Frequently Asked Questions
Q: What kind of lightbulbs are best for pot lights? A: LED bulbs are a popular choice for pot lights because they are energy-efficient, long-lasting, and produce less heat.
Q: Can I change a lightbulb in a pot light without turning off the power? A: Absolutely not! Always turn off the power before changing a lightbulb, even if it’s just a pot light. This is crucial for your safety.
Q: How do I change a lightbulb in a recessed pot light? A: Recessed pot lights often have a spring-loaded fixture that holds the bulb. Gently pull down on the bulb to release the spring and then replace the bulb with the new one.
Related Search Queries
- How to replace a lightbulb in a recessed pot light
- Changing a lightbulb in a pot light fixture
- How to change a lightbulb in a can light
- How to replace a lightbulb in a recessed ceiling light
- How to change a lightbulb in a recessed lighting fixture
- How to change a lightbulb in a pot light without turning off the power (This search query is intentionally included to highlight the importance of safety)
- Replacing a lightbulb in a pot light
- How to change a pot light bulb
- Changing a pot light bulb
- Replacing a lightbulb in a recessed pot light
Changing a lightbulb in a pot light is a simple task that you can easily handle yourself. Remember to prioritize safety and take your time. If you’re ever unsure, don’t hesitate to consult a professional electrician.
Q&A: Changing a Lightbulb in a Pot Light
Q1: What tools do I need to change a pot light bulb?
A1: You’ll need a ladder to reach the pot light safely, a small screwdriver (usually Phillips head) to remove the trim ring, and a new lightbulb compatible with the fixture. Some pot lights may require a special tool to remove the bulb itself, so check your fixture instructions if necessary.
Q2: How do I know what type of bulb my pot light needs?
A2: The best way to know is to check the old bulb. Look for markings on the bulb’s base (such as GU10, MR16, etc.) to determine its size and type. You can also check the manufacturer’s instructions for your specific pot light.
Q3: What are the common types of bulbs for pot lights?
A3: Common types include halogen, LED, and CFL (compact fluorescent) bulbs. Halogen bulbs are more energy-intensive, while LEDs are more energy-efficient and long-lasting. CFLs are a good middle ground but may not be suitable for all pot lights.
Q4: Can I use any type of bulb in my pot light?
A4: No, not all bulbs are compatible with all pot lights. The wattage and type of bulb must be appropriate for the fixture to avoid overheating or damage. Always check the manufacturer’s instructions and the old bulb for compatibility.
Q5: How do I turn off the power to the pot light before changing the bulb?
A5: Turn off the circuit breaker for the pot light. You can usually find the correct breaker by looking for the label on your electrical panel or by using a circuit tester.
Q6: What if I don’t know which circuit breaker controls the pot light?
A6: Use caution! If you’re unsure, avoid touching the wires and consult an electrician. They can safely identify the correct circuit breaker.
Q7: How do I remove the old bulb from the pot light?
A7: Twist the bulb counterclockwise to unscrew it. Some pot lights may use a special tool to release the bulb. Check the fixture instructions or the old bulb packaging for specific instructions.
Q8: How do I install the new bulb?
A8: Simply screw the new bulb clockwise into the fixture. Make sure it’s secure and doesn’t wobble.
Q9: What should I do if the new bulb doesn’t work?
A9: Double-check the bulb and the fixture. Make sure the bulb is securely in place and that you haven’t accidentally broken it during installation. Also, ensure the circuit breaker is turned on.
Q10: Are there any safety tips for changing a pot light bulb?
A10: Yes, always: * Turn off the power before touching any wires. * Use a ladder to reach the light safely. * Wear safety glasses to protect your eyes from broken bulbs. * If you’re unsure about anything, consult an electrician.
Conclusion
Changing a pot light bulb might seem daunting, but with these simple steps, you can tackle the task with confidence. Remember to always prioritize safety by disconnecting power before working on electrical components. Carefully remove the trim ring, unscrew the old bulb, and install the new one securely. Finally, reattach the trim ring and enjoy your newly illuminated space.
We hope this guide empowers you to tackle your own pot light bulb changes. Share your experiences in the comments below! Did you find this guide helpful? Have any tips to add? Let us know! Also, don’t forget to share this post with your friends and family on social media so they can also learn how to change a pot light bulb with ease.


One Comment